Screwing around with Xbox One
These are my notes on mucking around with my old Xbox One for a bit. I swapped the drive and thermal paste and did some amateurish performance measurements of the latter.
- Skip to #The upgrade for step-by-step instructions for upgrading your drive.
- Skip to #Thermal paste for the thermal paste upgrade
Context#
So I bought the original Xbox One in 2015 when it was on sale for like 200 bucks. It’s mostly just been sitting around, but recently I gave it another shot because COVID-19-induced homeoffice did not work well for me. I was getting distracted a lot on my work computer, and I think a lot of that was because it also doubled as a personal machine/gaming rig. So busting out the Xbox again was one way to have a separate work environment and hopefully improve that.
I used to be more of a PC gamer, so I was originally planning to build a separate gaming rig, but I realized that since I quit competitive PC games (got a tendency to become way too invested in them) the Xbox would work perfectly fine for me. And Game Pass solves the issue that my whole games library is on Steam. Instead of shelling out a grand+ for a new machine, I now get access to more games than I’ll ever get around to playing for the same cost as Netflix.
I can’t choose which games I get, but I don’t really care that much nowadays. The selection is big enough that there’ll always be a few interesting games, and I’m just looking for something that I can relax with for an hour or five after work.
Happy with this “new” setup, I went ahead and downloaded a few titles that seemed nice - Forza Horizon 4, Fallout 76, The Outer Worlds, and boom - about 75% of disk space gone.
Back in the day I thought CoD MW2 was huge at like 16GB, but things have gotten ridiculous nowadays. The newest CoD clocks in at 200+GB. Seems like game sizes is one area where Moore’s law held up.
So a 500GB HDD is not even close to enough in 2020. And to be honest, it was pretty weak even at the Xbox One’s release in 2013.
Luckily I had a 2TB SATA SSD lying around because it (not so luckily) didn’t work for its intended purpose, cloning and expanding my Hackintoshs’ macOS install that is confined to a tiny old 240GB SSD. APFS doesn’t seem to be able to expand, and I was frankly too lazy to reinstall.
So the next best thing was upgrading the Xbox with it.
Drive upgrade#
You could just plug in an external drive, but swapping the internal drive avoids the USB bottleneck (not that bad with USB3, but in practice even SATA2 is going to be better) and you don’t have another box to hide. Also, it’s fun.
Choosing a drive#
I’m using a Crucial BX500. As of right now it’s at 160€ and it was by far the cheapest name brand SSD I could find when I bought it. Most 2TB SSDs are at 200+€.
Its reviews are mixed, I mostly bought it because it was so cheap, and I even bought it for another purpose. But I actually think it’s a really good fit for the Xbox.
The main issue reviewers find (next to a cheap feel, which I honestly could not care less about) is poor performance. A few points:
- The BX500 has about 13GB of SLC cache. Once that’s full write speeds will drop to ~100MB/s.
- Very slow copying (~50MB/s)
- Slow random read: about a third of the throughput of the fastest drives
These issues are worth considering, but I think that in a gaming console many of them don’t matter that much or at all. For example, about the only time you’re going to write more than 13GB at once is when downloading a new game, and then even with a gigabit connection the drive won’t bottleneck you.
In general the Tom’s Hardware review linked above found that on the BX500, game load speeds are something like 20% slower than the fastest SATA SSDs. That’s not too bad and worth the cheaper price to me.
What’s interesting though is that in their game load time benchmark, a HDD was only about 40% slower than the BX500, and about 70% slower than the fastest SSDs. So if you’re broke and/or a cheapass, a HDD isn’t that bad of a choice, and will save you about a hundred bucks. And you can just plug it in via USB without losing much performance.
OTOH, a 40% decrease in load times still is almost a halving and can take load times from excruciatingly long to just about bearable. And in my experience that’s exactly the case. Subjectively, Fallout 76 loadscreens went from firmly in smartphone break territory to a comfortable 10 seconds or so.
With a faster SSD, you could shave another second or two off that, and it’d be a nice bonus, but for me it’s already past that critical point.
So overall I think with the BX500 you get pretty good bang for your buck in this particular usecase.
The upgrade#
It turns out that unlike with APFS, upgrading your Xbox drive is a relative piece of cake. You basically just plug it in (doesn’t even have to be formatted in any way) and install the OS to it via USB.
There are a lot of guides out there on how to clone your Xbox’s original drive to the new one using special software, but that’s no longer required since the Xbox can now reinstall the OS from a USB drive. Note that you do have to redownload your games and apps if you reinstall the OS, but that’s a minor issue to me.
1. Physically swap the drive
Check out the iFixit guide on that. I’ve linked the one for the original Xbox because that’s what I have. They also have guides for the newer versions though.
Notes:
- You will need T9 and T10 Torx screwdrivers and a plastic opening tool. A small flathead screwdriver will do the job but it’ll also leave marks. If you don’t want that, get a set of tools from iFixit. They’re really useful for any such task and pretty much BIFL.
- You might have to apply a surprising amount of force at some points (for me that was removing the front panel and the WiFi board.)
- The guide says your Xbox will not be able to format a new drive. This is no longer true. You don’t have to format the drive at all beforehand (mine was still formatted with APFS).
- While you’re at it, you might as well swap the thermal paste.
2. Prepare a USB drive
- Download the OS from Microsoft
- From here on you can also follow Microsofts (rather convoluted) instructions. I’ve tried to simplify them below.
- If your Xbox OS version is halfway recent you will only need to download OSU1, no matter what console you have
- Format an 8+GB USB drive to NTFS
- This pretty much requires a Windows or Linux PC. It’s a huge PITA on macOS.
- If you only have a Mac, you could however try something crazy like passing the USB port through to a VM I suppose.
- This pretty much requires a Windows or Linux PC. It’s a huge PITA on macOS.
- Unzip the downloaded zip file to the freshly formatted USB
- In the end, there should only be a
$SystemUpdatefolder in the root directory of the USB drive.
3. Install the OS
- Turn off the console
- Plug the USB drive into the console
- Hold the Pair and Eject buttons and press the power button once. Keep holding the Pair and Eject buttons.
- There should be a startup chime and then another after a few seconds.
- You can let go of the buttons after the second chime.
- In the menu, choose the option to install an offline update from a USB drive.
- Use the D-Pad. Analog sticks won’t work.
At this point, you’re basically done. When the install completes, your Xbox will be like a completely new device, but with a comfy amount of space on it. It’ll walk you through the setup process and then you can start downloading your games again. Mine’s now sitting at ~750GB free after installing 22 games.
Thermal paste#
She was already bare and naked before my eyes, I couldn’t resist the temptation to go all the way with her.
Testing setup#
You can’t read out the CPU temperature on the Xbox One. A quick Google search for xbox one read cpu temperature brings up this reddit thread as first result, where the top reply simply tells you “there is no reason you need access to that info”.
I guess I’m not used to the locked down nature of game consoles enough to just accept that fact like that guy, so I made a beyond amateurish attempt at measuring the performance of the new thermal paste.
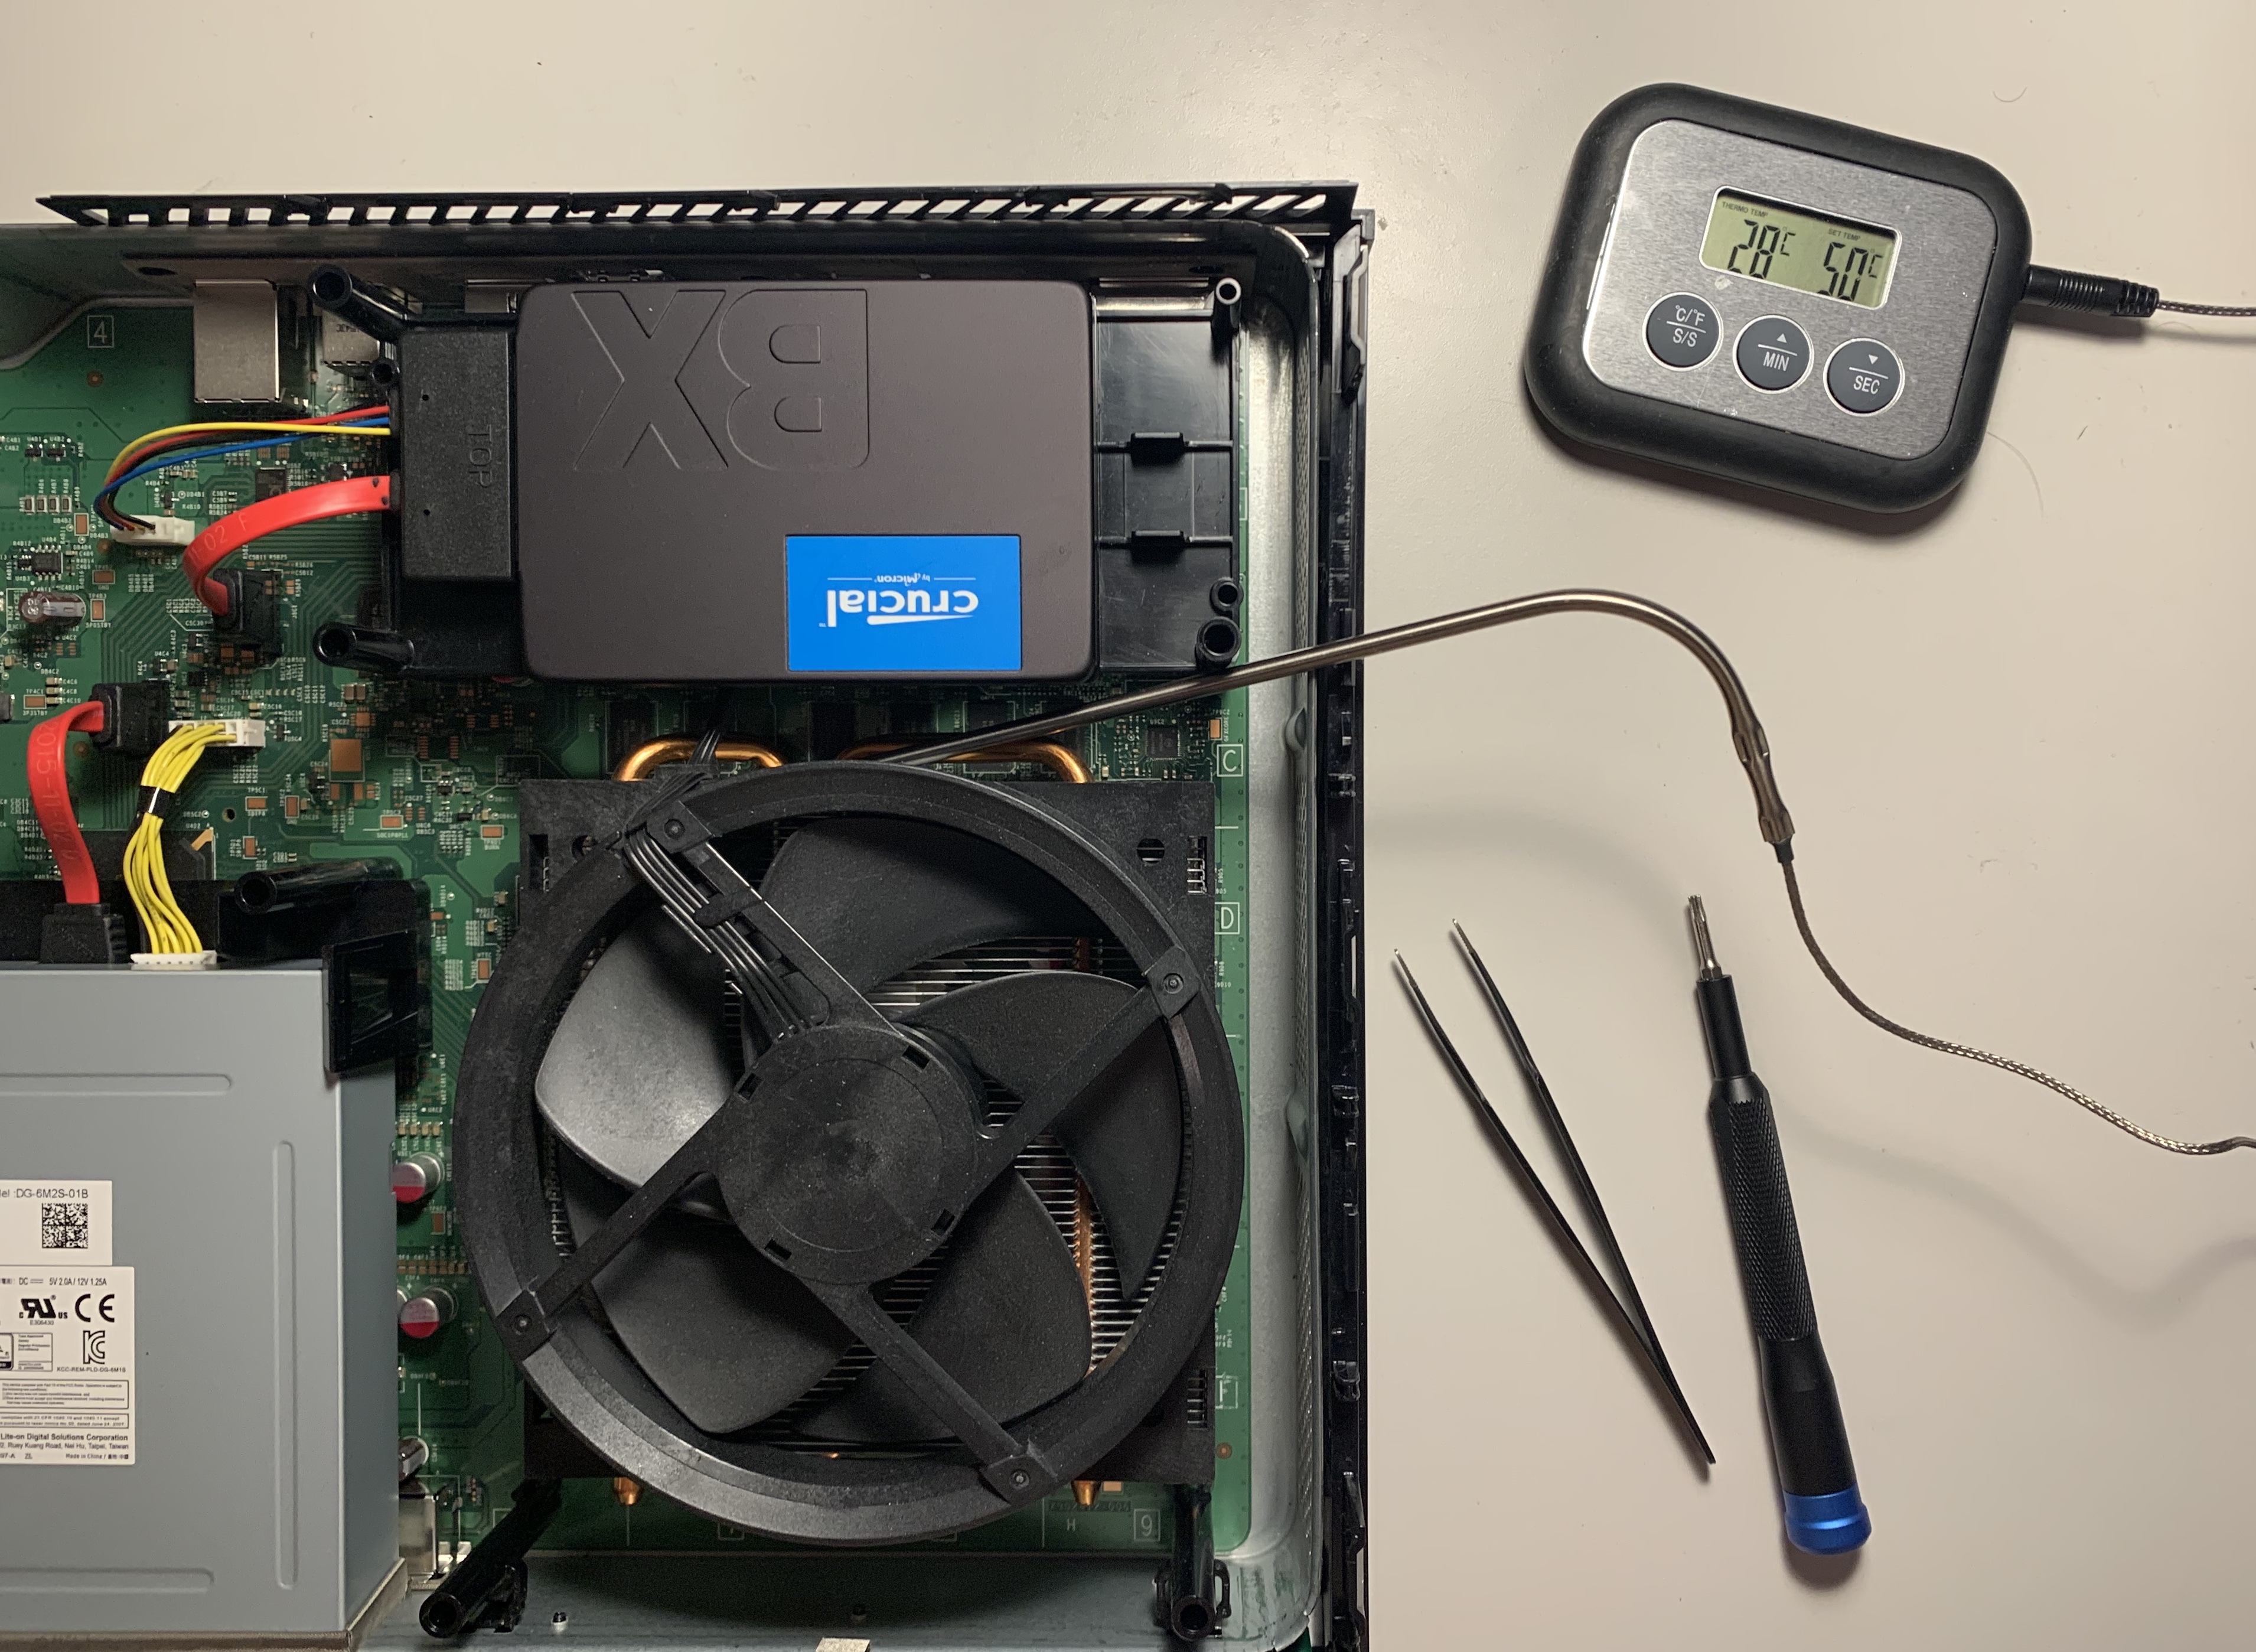
I have a food thermometer for nailing my steaks every time. Too far-fetched to think it could do this job? (Spoiler warning: yes.)
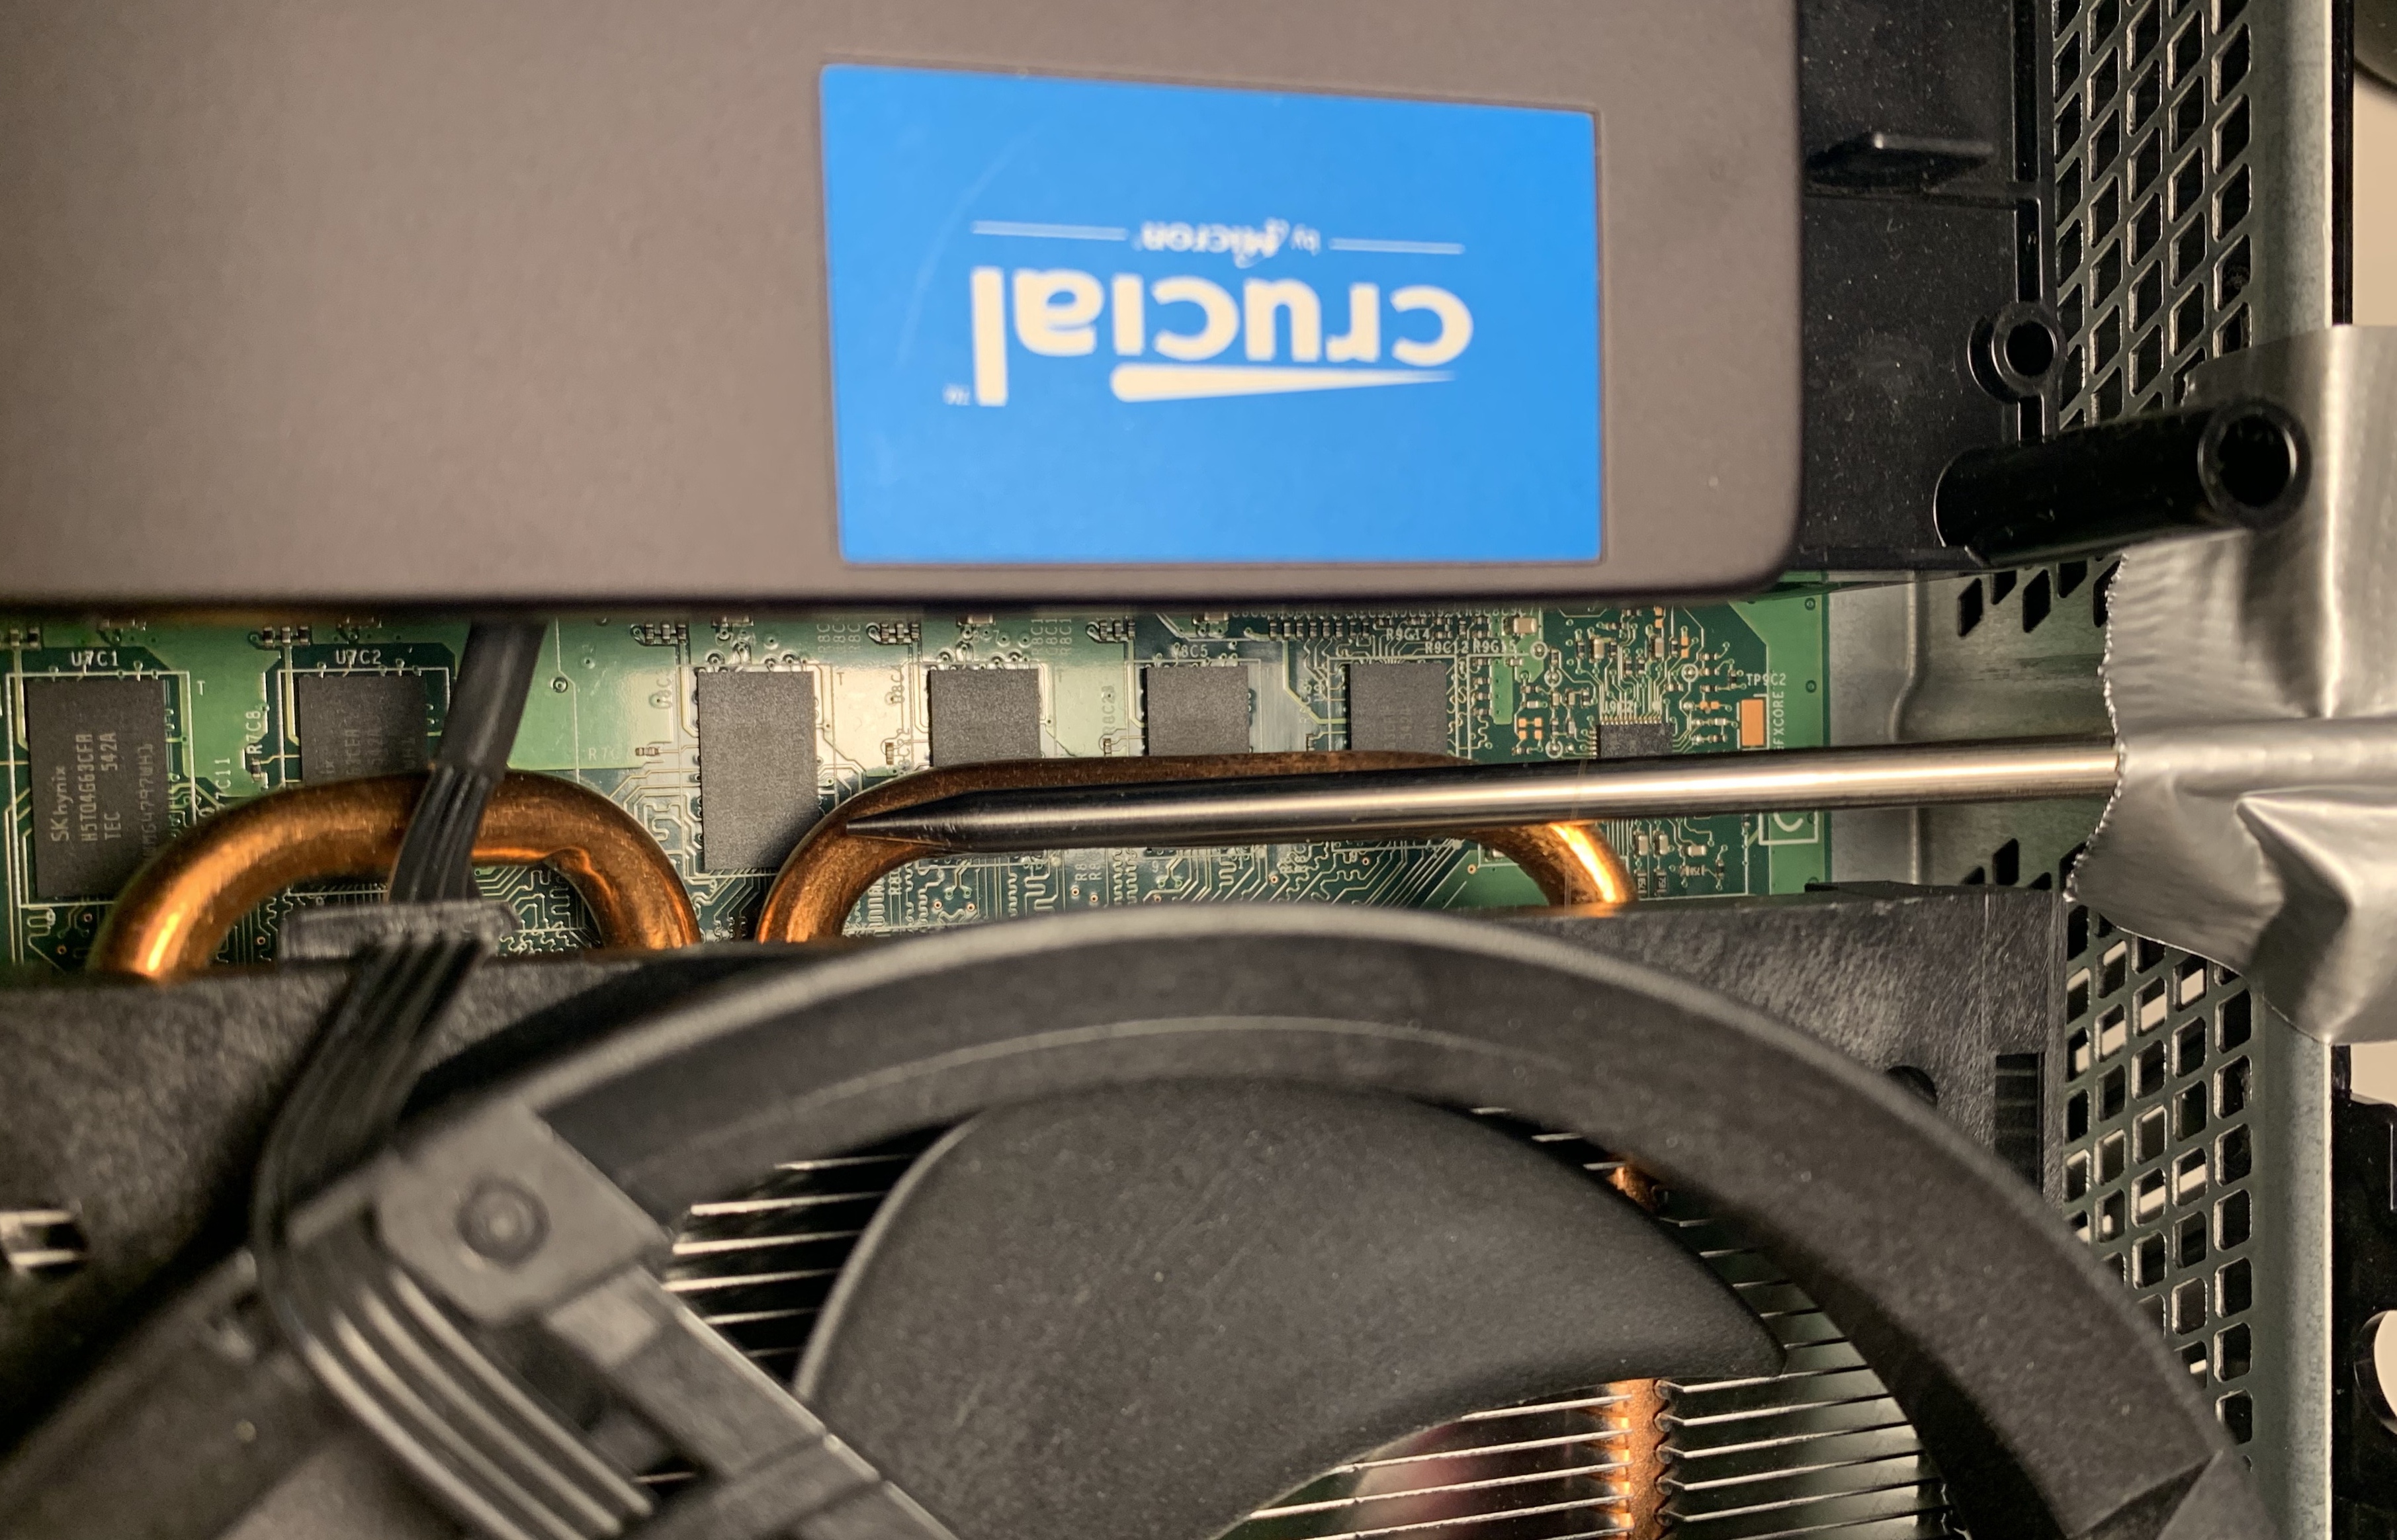
The food thermometer’s probe is made of metal, so I had to keep it away from the PCB. I figured the next best place to get an idea of CPU temperature are the heatpipes. I simply taped the sensor in place, trying to maximize the contact area.
Testing the setup with Fallout 76, I noted the current temperature and time every few minutes.
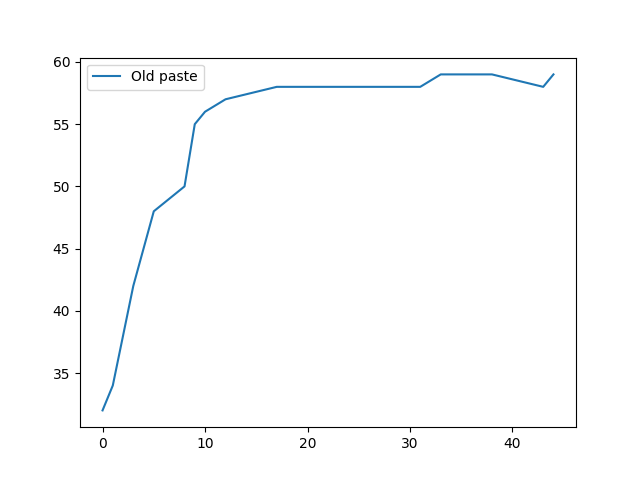
Temperatures seem to stabilize at 58-59C after 15 minutes.
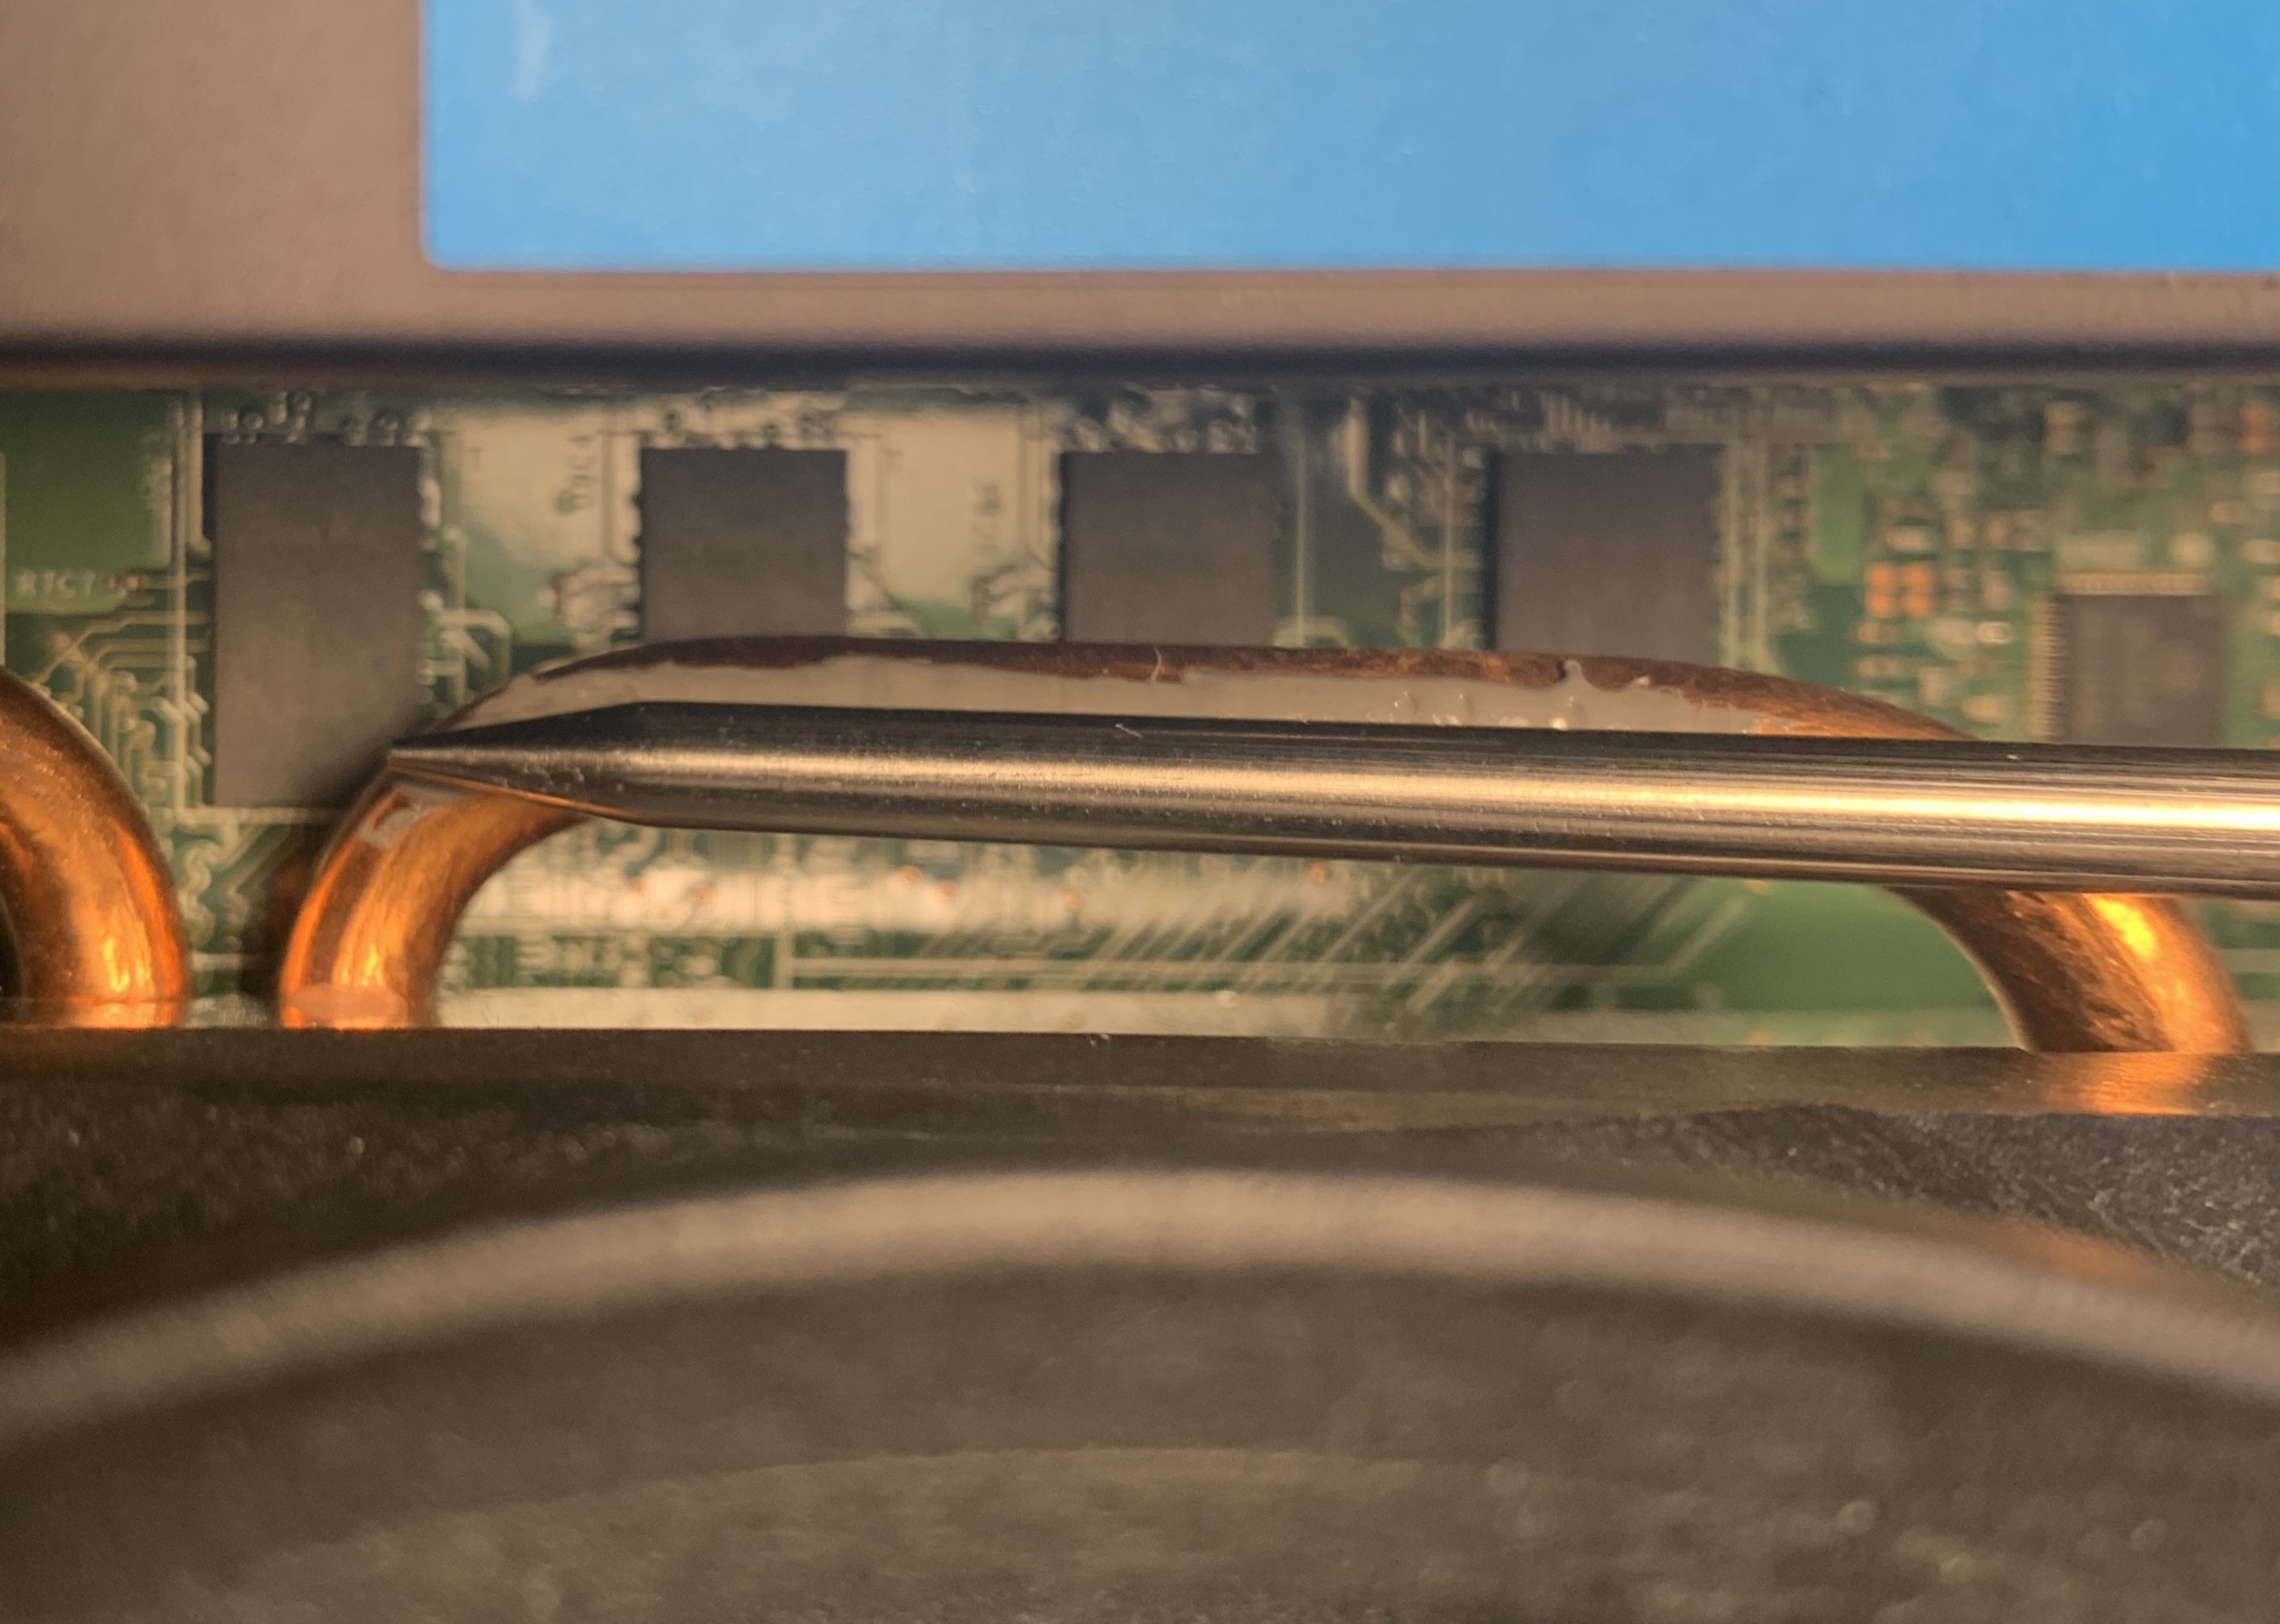
Granted, the contact between the probe and the heatpipe was probably pretty shitty. To confirm, I applied thermal paste between the sensor and the heatpipe:
The results are kinda surprising:
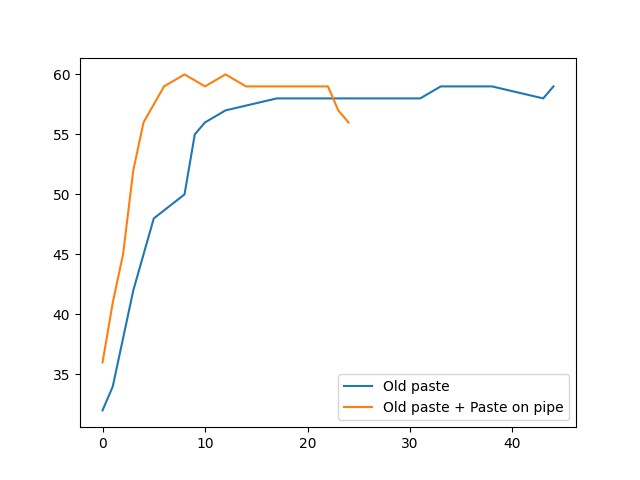
The only effect the thermal paste seemed to have was accelerating the warmup phase and finally a 1-2 degree difference in temperature. It also kinda makes intuitive sense though, and mostly it indicates the contact wasn’t that bad. Sadly the sensor slid off the heatpipe due to the paste (that’s the temperature drop at the end). So for stability, I did the final experiment without thermal paste on the pipe.
Swapping the paste#
I just followed the iFixit guide. There’s nothing too tricky about the process, but one thing that might trip you up is the X-clamp. You need to apply a fair bit of force to pop it off, and reattaching it is tricky. This video helped me with that.
For the paste, I used Arctic Silver 5, simply because I had it lying around from my last PC build.
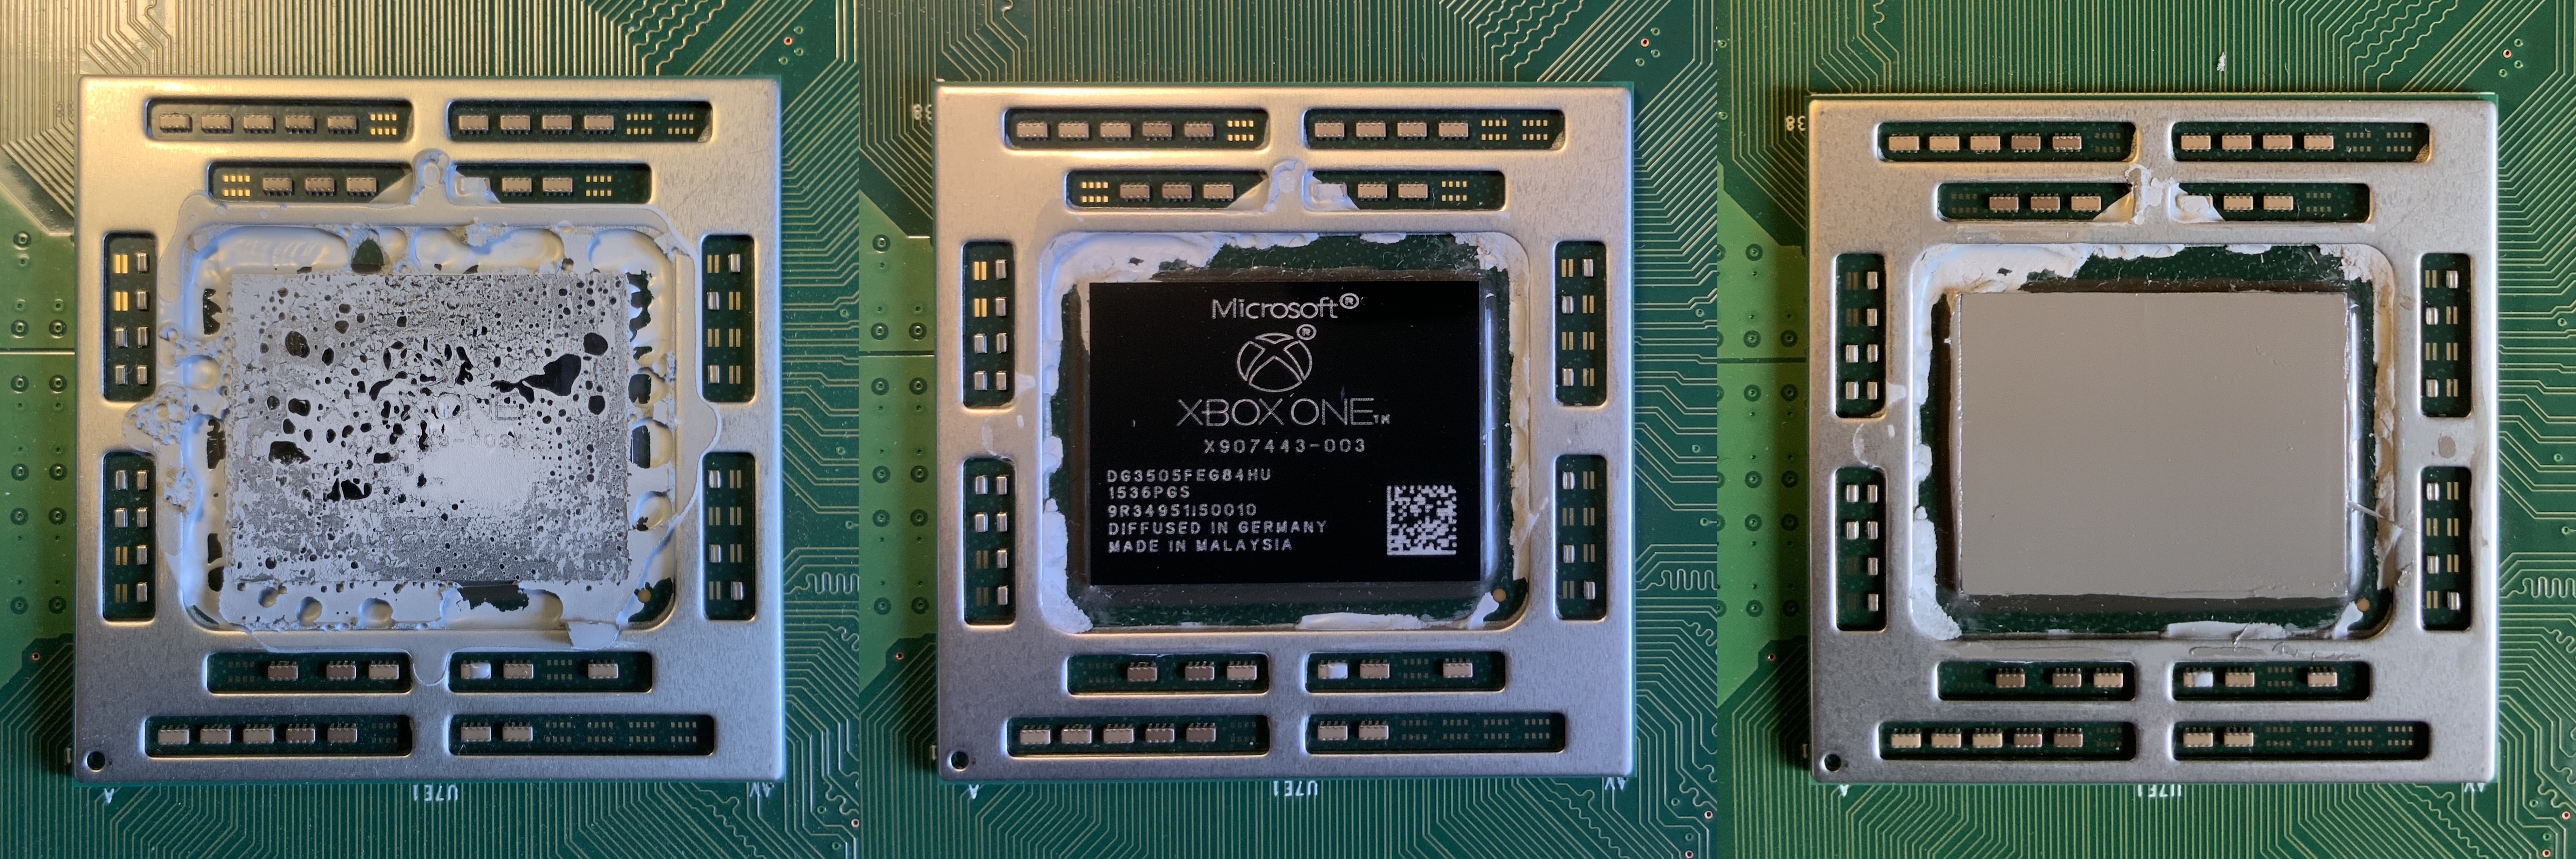
This is the CPU with the old paste, cleaned, and new paste applied:
The mainboard:
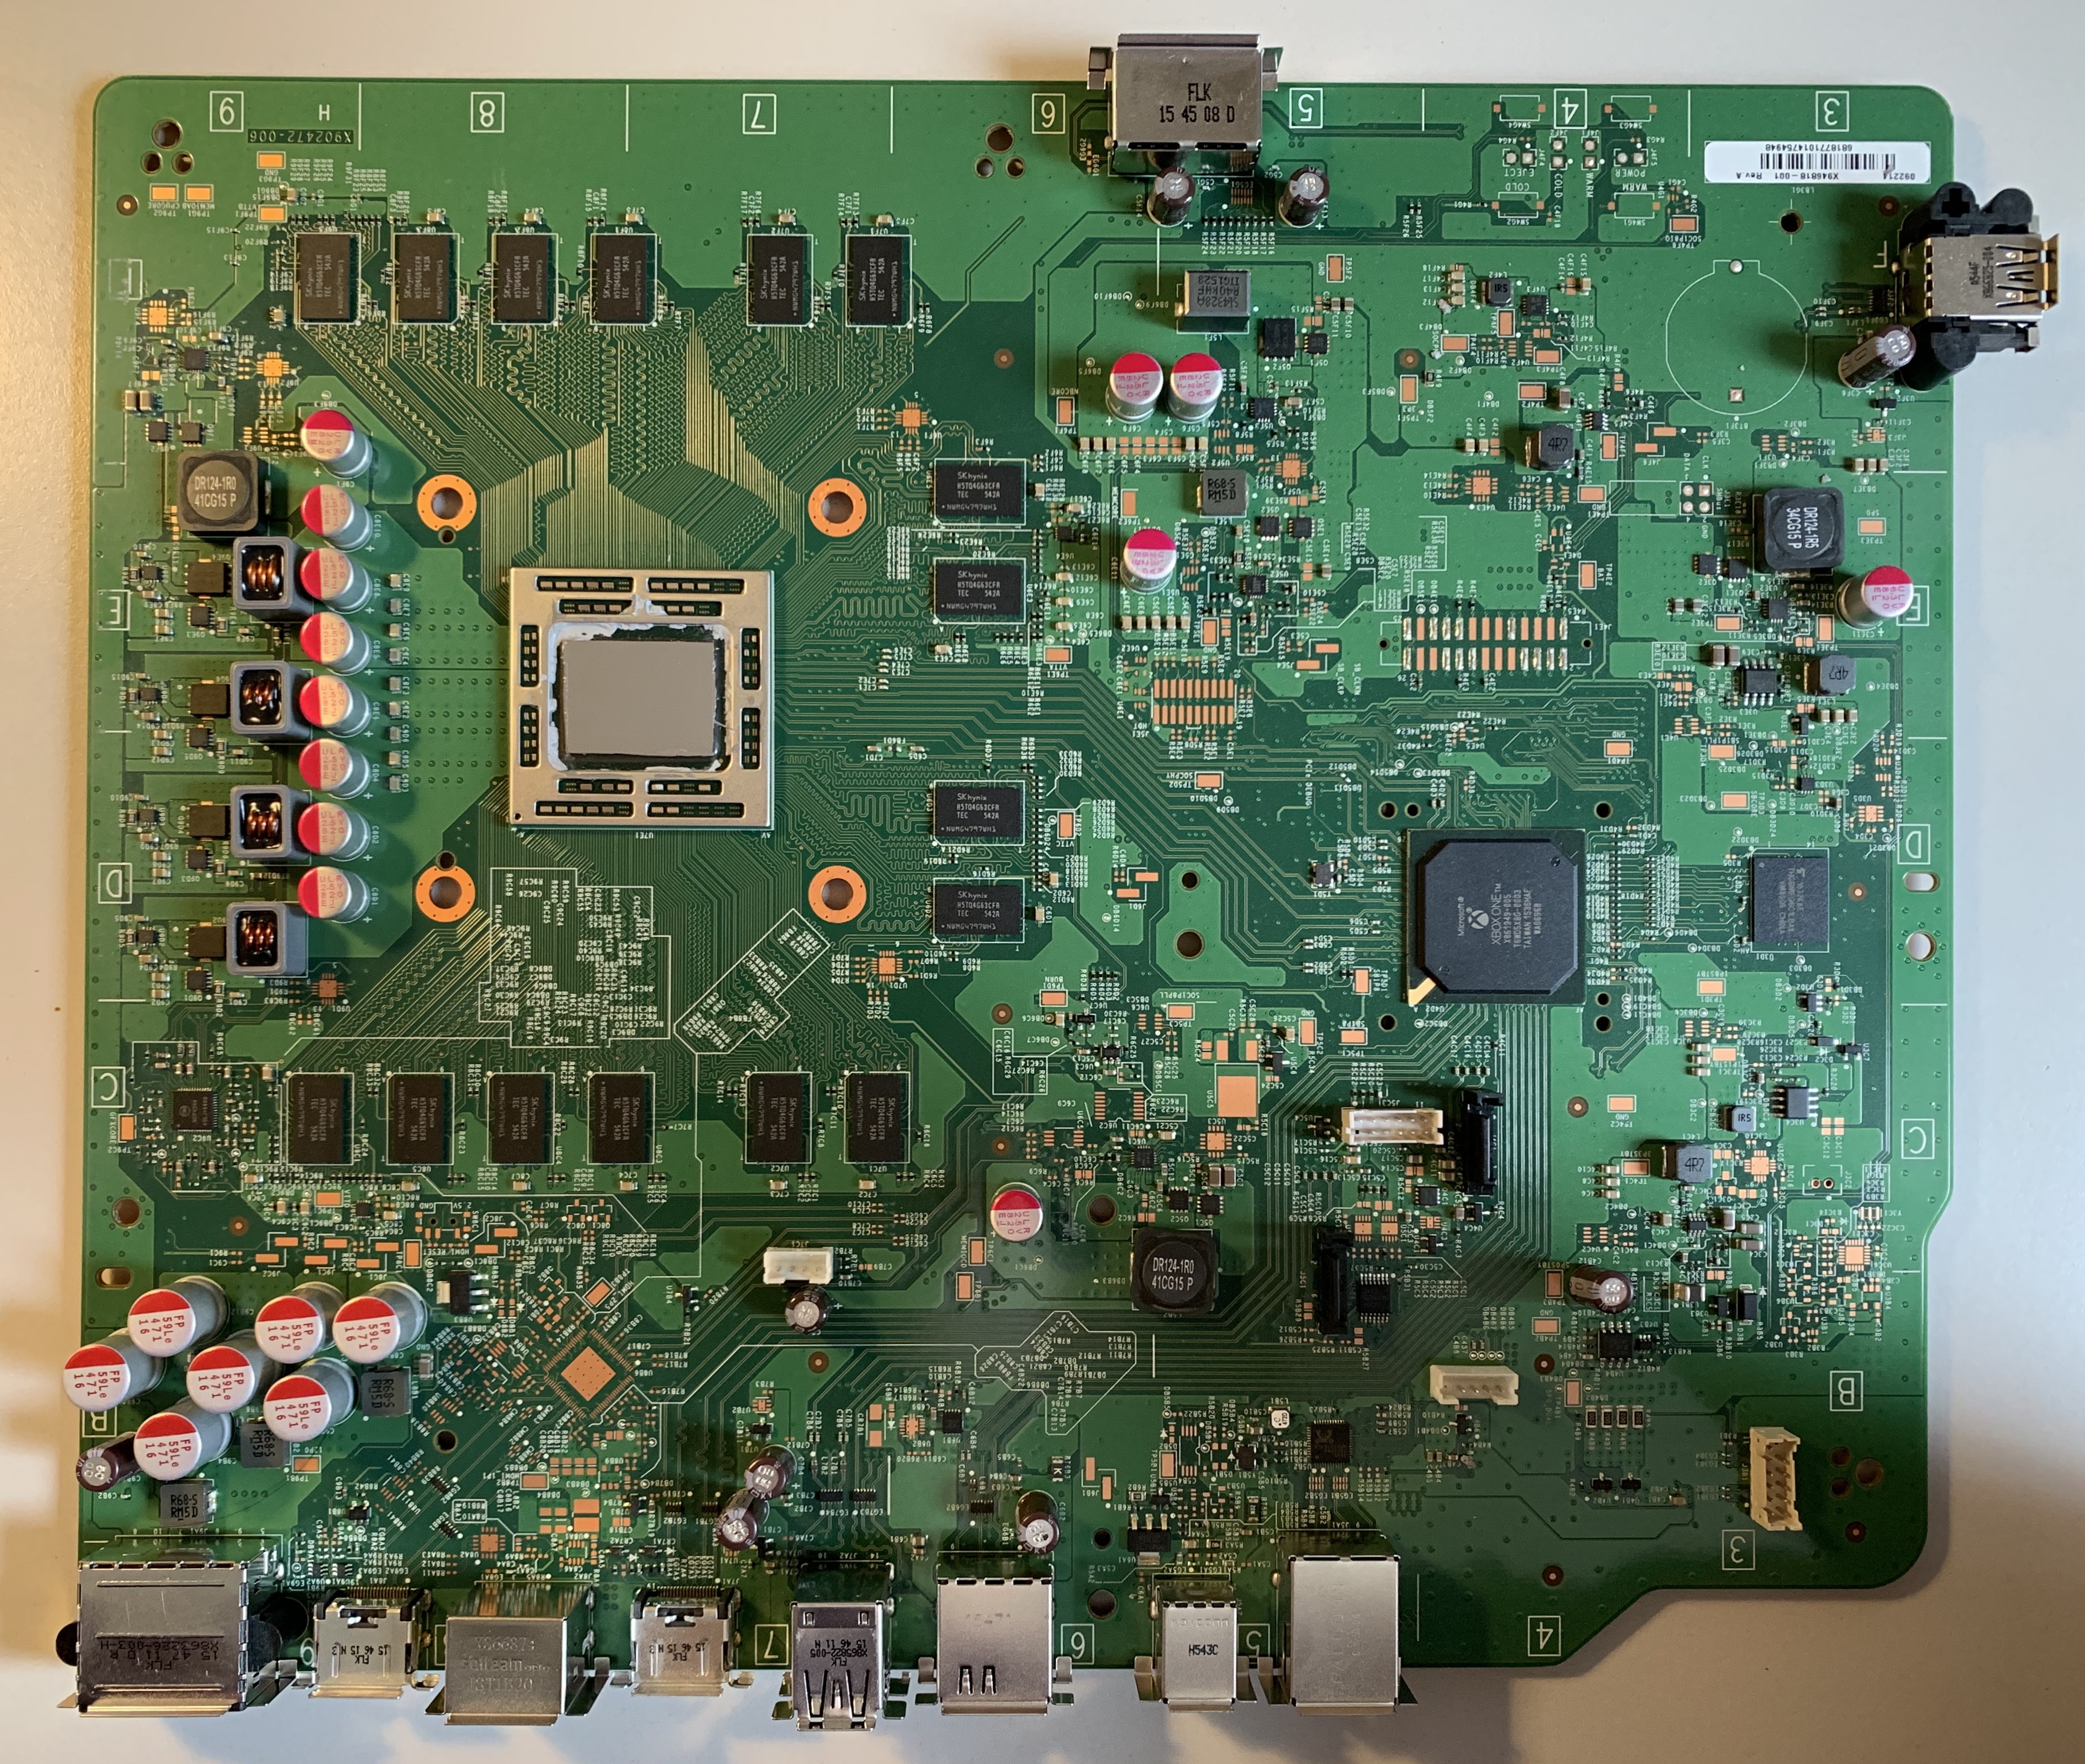
I think it’s pretty neat that they labeled the chips with a logo even though barely anyone is going to see it. The mainboard is surprisingly light too, I guess because the chip is soldered on so there’s no heavy socket, nor any expansion slots. And its layout is very spacious compared to typical PC mainboards. Seems like they could’ve made the OG Xbox a good bit smaller but chose not to.
Final results#
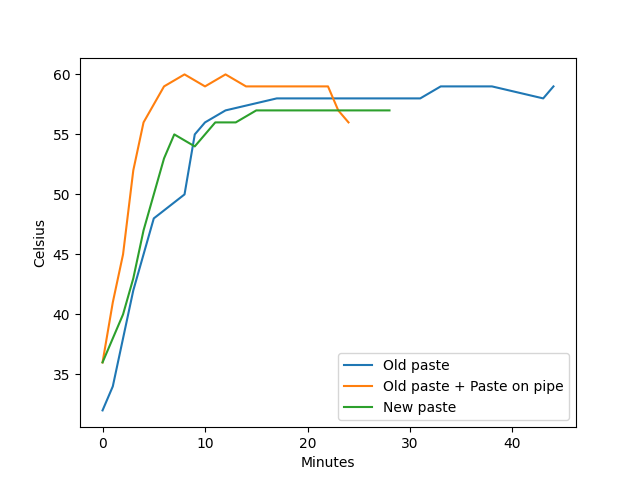
I don’t really know how to interpret this result - I guess lower temperatures are better, but I imagine that if the CPU is running cooler due to a better heat exchange, the heatpipe should actually get hotter. It’s also just a one degree difference that could be due to a change in ambient temperature or other environmental factors.
Conclusion#
Swapping the drive to an SSD was absolutely worth it. Load times are now tolerable even to my ADHD brain. I recommend doing this swap if you’re somewhat handy with computers. Otherwise, you’ll probably also do fine with a USB SSD (or HDD), even if it’ll be a little (or a lot) slower. The main thing is getting more storage anyway.
As for repasting, the results are inconclusive, which was then again predictable given the pathetic testing setup. But in any case there’s no vast degradation. So to be safe I’d say swapping the paste is probably not worth it unless you think it’ll be fun. As for difficulty, if you’re comfortable with building PCs, you can also do this.